From Idea to CAD
A systematic approach

Using this 3D printed engine which I designed from scratch in just 3-4 days. I'll show you the concrete steps which you can use in your own designs, to go from "I want to make a steam engine working on compressed air" to a complete 3D.
This took me a decade to figure out. So if I can help you spare some time, I'd be more than happy. Sure, I'm trained as a mechanical engineer, but don't worry! If you're an artist or designer, you'll get the gist of it too. No math involved.
No, I won't tell you some lofty design theory or principles which are so abstract that you can't apply to your design problem.
Neither will I tell you a sequence of buttons which you need to click in your CAD to get a desired geometry. There's tons of great tutorials out there on that.
Rather, I want you to be able after this essay to have a more systematized approach to tackling your own mechanical designs. You'll see, you'll be incredibly more productive.
The method
Taking the 3D printed steam engine as a concrete example, let's first quickly go over how I designed that steam engine:
Requirements
First, I defined my requirements. This allowed me to make sure that I wouldn't start zig-zagging between different wants or ideas further on. There, I also checked for feasability by looking at what others had already done. That took me roughtly 3 hours. These are the requirements:
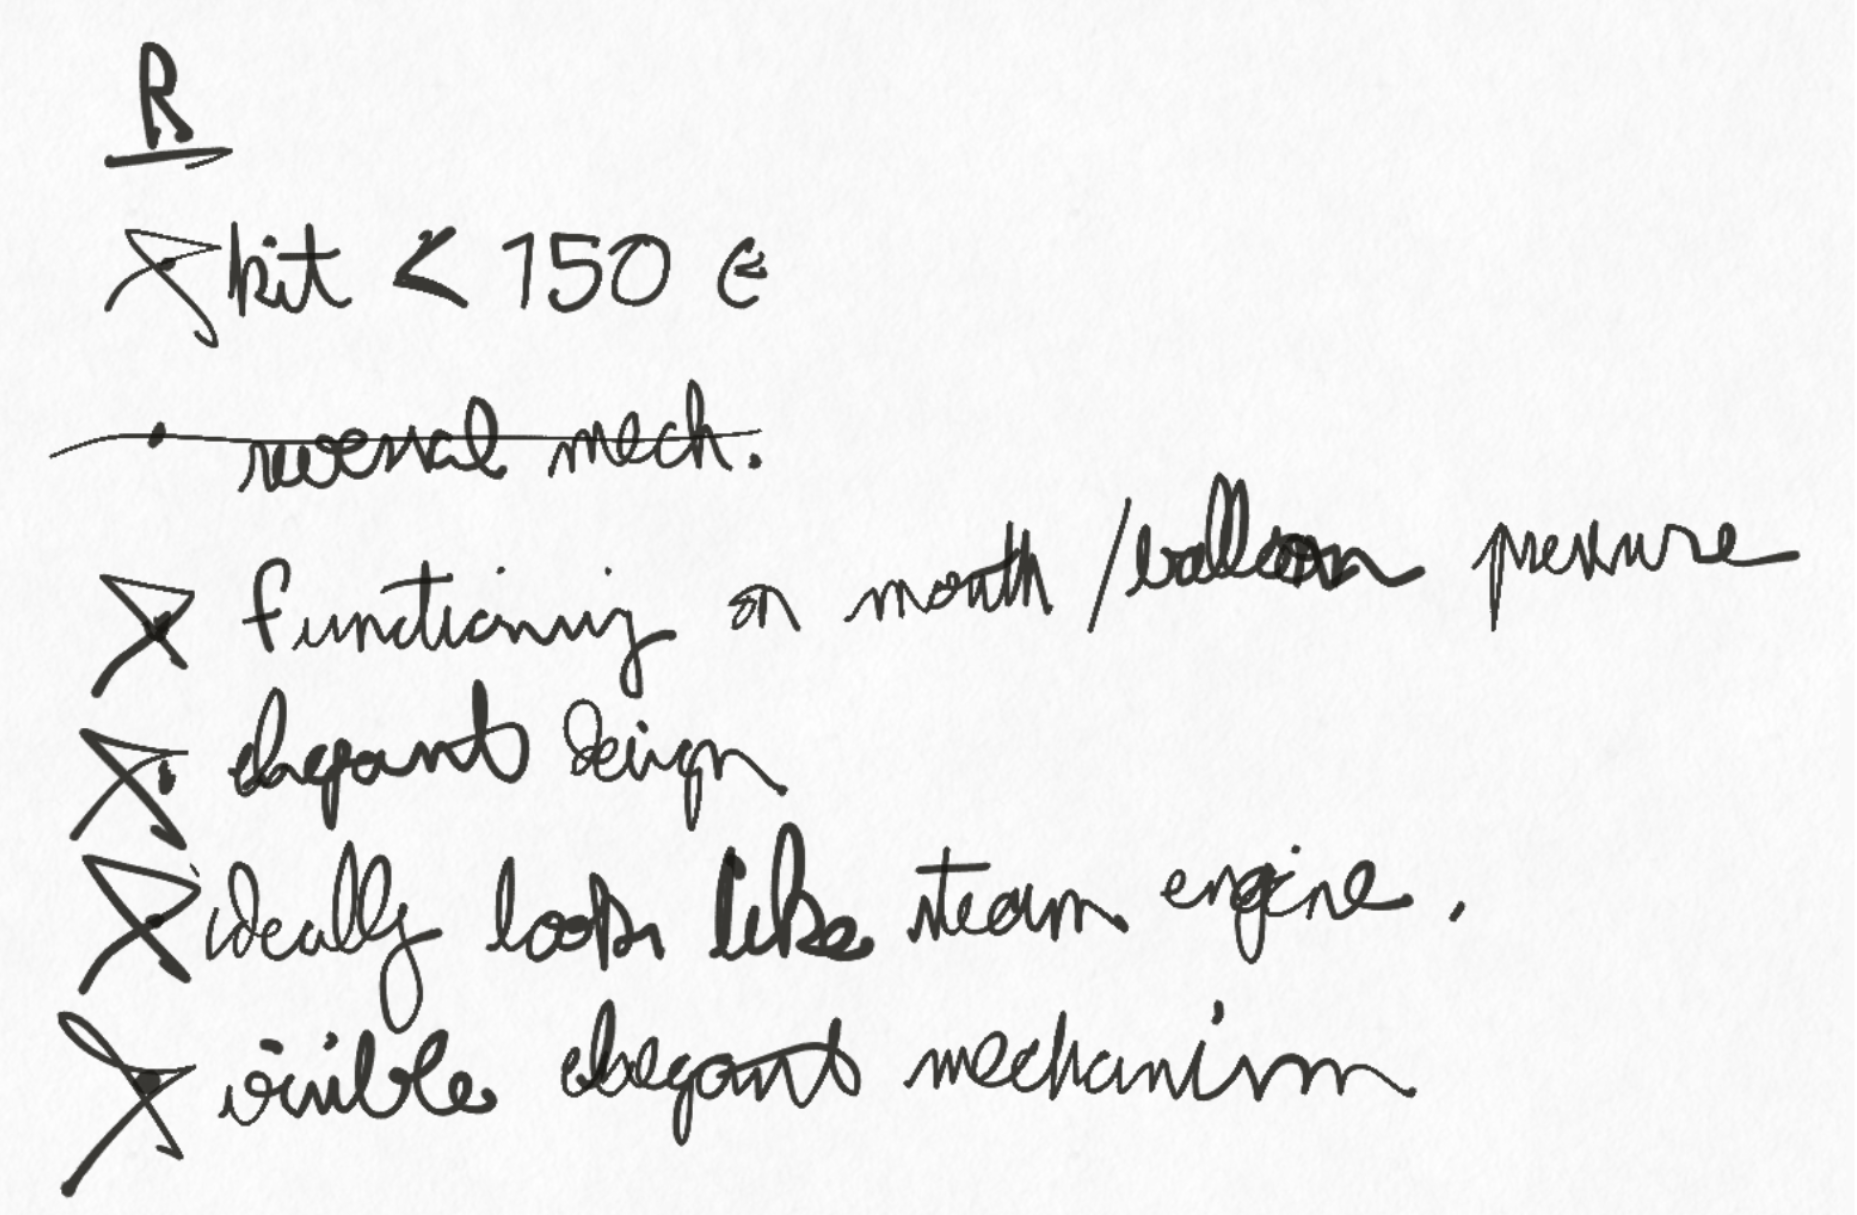
While not much of the thinking actually landed on paper (when you’re alone documentation doesn’t matter that much), quite some thought went into it.
Mechanism Ideation
Then I split my problem into manageable sub-problems. For example, there..

..the power piston and its bore. For each sub-problem, I brainstormed a few variants. In this example, the piston could be square, round, with an o-ring, etc:
2D sketching
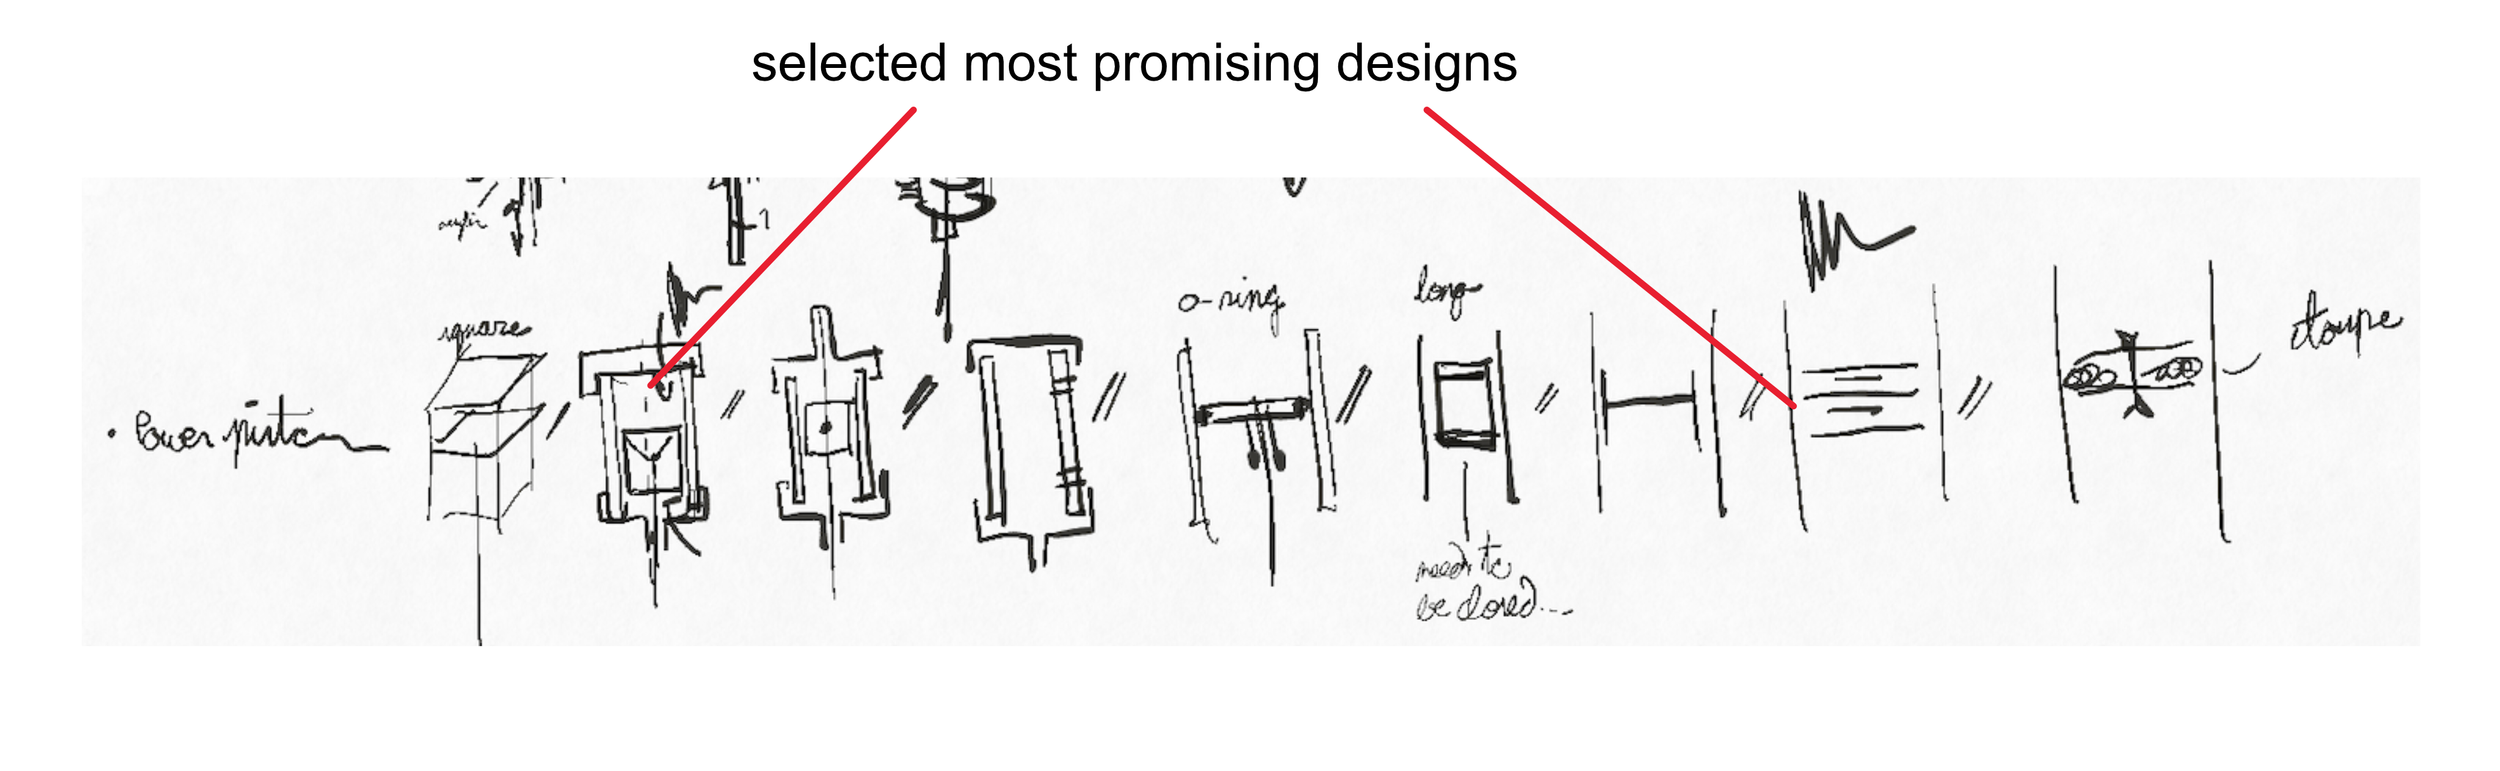
After repeating this exercise with all other sub-problems, for each sub-problem, I selected 1 or 2 designs which seemed most promising. Yes, this required experience and a bit of luck. But in fact there's quite robust tools for selecting the optimal solutions, we'll touch that later on.
In the end, there’s how all my variants look like:

I then fleshed out a first draft of the entire design by sketching it in 2D. This time, I used accurate proportions: I started of by defining which diameter tube I'll be using for the piston bore according to what I can buy online. For manufacturability, I've restricted all laser-cut parts to be either 3mm or 1mm, my shafts between 1,5mm and 3mm, and using M2 & M3 screws. It's not like I'm measuring everything. No. Instead, I just draw with a grid in the background on a 1:1 scale and mostly eyeball the proportions away:

And sure enough: Things at this stage were messy. And that's okay! To arrive to this result, I erased entire sections of my drawing many times over. At this stage, any design modifications come cheap.
When I realized that I was only beautifying the sketch -but adding nothing more to it, I stopped sketching. See? That's what happened there:

See how the new drawing (in black) looks the same as the older drawing in grey? So I didn't even bother continuing and directly jumped into my CAD software. This 1:1 sketching took me about 6 hours or so.
And because one of you will certainly ask what software I'm using: I'm using the Concepts app running there on ipad (also works on Android and Windows). But really, you could just use pencil and paper.
CAD
In my CAD, I created a new assembly with the same reference point as in my 2D sketches. I then added my first part to this assembly: The cylinder bore of the piston.

Since my drawing is at 1:1 scale, all I needed to do is to duplicate the measurements from my drawing. Naturally, I rounded off the dimensions and made my 3D parts mate with each other. That's how the assembly progressed:

Really, the beauty of this approach is that I could focus solely on modeling each part of the engine. Indeed, I've already defined sufficiently precisely how each part looked like and its location in the 2D sketching. So I worked my way on each 3D-printed or laser cut parts in an almost random order. The parts didn't need to be perfect or completed just yet. For example, all mating parts had no gaps between them to allow for some play due to manufacturing intolerances. Too, I tended to omit the mating holes for screws and shafts and decorative features. Note too that I never sketched my parts using any fancy relationships between parts. You know: projections, links and all the gore. Why? Because unless you know exactly what you're doing, this can blow your entire design if something needs to be modified later on.
Naturally, you'll always discover a big screw-up or two when doing your 3D. And that's okay. We're just humans. In my case, I realized that the way I wanted to assemble the piston bore and the piston was really clunky. It probably wouldn't work. So I went back to my 2D sketches, came up with additional concepts, re-modelized a few parts and the problem was lucky quickly solved.
Before adding all the pins and screws, you might want to take a moment to clean up your assembly. In my case I re-positioned most of the parts of the assembly as they were floating in mid air. At the same time, I modified the lengths of the cranks to match some simple arithmetic I did on the side. You know, to get the proper valve timing and all.
I didn't even care to have the assembly animatable with crankshaft action and the whole simulation. I didn't really need it. I just moved things manually to check for collisions. Then, I added all the pins and screws to the assembly and play between parts where needed, the whole modeling took me around 12-16 hours.
Ah, and I'm using T-flex cad running on Windows. But again, use whatever CAD system you're most comfortable with.
Verification
So you think we're done? Wrong! We still need to verify throughoully our design. In fact, at every previous design phase, I checked that all was okay before going to the next phase. But now that I was about to slap about a 150 Euros on the table to produce the design using a 3D printed and laser-cutting supplier, well, best double check. To do so, I made myself a check list. Verified the concepts, collisions and pretty much anything I could come up with. Rather than immediately rushing to fix every bug I saw, I listed the bug down and continued verifying further. This trick allowed me to 1) remain focused on finding bugs. 2) By setting the actuall bug fix later, it allowed me to be less prone to be lazy and turn a blind eye on bugs. Actually, after many failures, I've developped the mindset that every bug discovered now will save me valuable time later on. Thanks to this, I now how to make twice less prototypes than I used to before. After all, there's a reason why we call engineering a discipline because -you know- it demands discipline. Huh!
The final verification took me about 3 hours.
So will my steam engine design work? I hope so, but I'll have to make it to see. Fingers crossed.
Why it works
Alright, where is Houdini hiding in all of this, huh? Why believe that this method works? Well, just look at my spectacular results...Hah!
It's really not magical. There are two things at play: Gradual detailing and maximizing iterations early on.
Successive Refinement
If you look carefully, you'll notice that at every design stage, the design gets more and more rigid. In other words, at every stage, it gets more difficult to steer the design somewhere else. So what we want to do is to start with the most important: What do we actually want to do? What can we afford? etc. and only progressively go into the less important and more detail-ish work.
Since all parts composing the mechanism are interrelated, you can't just run wild and perfectly detail -say- the piston while ignoring all the rest. Nope. If you do so, you'll likely end up with a 3D CAD piston design which fully incompatible with the rest of the design. This is why my design method gradually adds the same amount of detail at each design phase for every function or part.
If you look closely, the whole approach is centered around that: First I force myself using only words. With words, you can't really describe a mechanism right? And that's a good thing! Then, during the brainstorming, I make tiny ugly sketches which only I can understand. Again, I'm actually assuring myself that I don't start adding too much detail. Then, doing a 2D 1:1 hand sketches, one can add detail, but certainly not everything as you can in CAD.
So that's gradual detailing (so-called the successive refinement doctrine in systems engineering limbo): At each step, add the same even amount of details accross your entire design. Re-iterate that step over and over until you get a fully fleshed out 3D model.
Alright, what about maximizing iterations?
Maximizing iterations
As mentioned before, the deeper you go into your design, the less flexible you become. Which is why you want to make sure that the important initial decisions are the right ones. How do you know your initial decision-making will hold to the test? Quite frankly you don't. But! You can maximize your chances by testing out different ideas rather and just diving ahead with the first idea which came to your mind. No. Instead, you want to start off your design playfully explorative like a child in the beginning while being more-and-more focused as your design gets completed.
For my steam engine, I spent quite some time mulling about whether to even do such an engine in place. Why even try to accomplish that? I asked. I then mulled over if I should not rather go with a combustion-type of engine. This would have been simpler, yet on the other hand it would not align with the future project I had in mind, etc. I also asked myself if it wasn't wiser to do physical mock-ups of each separate function before even starting to design the steam engine. You know, to gain experience on how to design valves, cylinders and stuff like that. I eventually decided against this approach as building a full engine in my case would take about the same amount of time than making many different prototypes.
Also, by doing 2D sketches rather than immediately going into CAD, I can quickly explore the viability of different designs. Indeed, in CAD, everything needs to be precise. But when sketching in 2D, I can use symbols, parts can collide, nothing needs to be precise, etc. And that's great! Because it allows for many more iterations that if I had jumped directly into the CAD. Again, the whole idea is to optimize as much as possible before going into a more expensive and time consuming phase.
How do we select between variants?
Alright! Alright! But how do we know select between variants? In a nutshell, you first try to elimiate all the variants which likely won't work. I've done this there entirely through gut-feeling and intuition gained from experience. It's -after all- just a toy. If you're developping something outside your comfort zone, you better use calculations, simulations or perform simple experiments. But hey!, you might ask, what about all the variants which are feasible? A good 4 of those variants are possible. To choose, I rely mostly on 2 heuristics (axioms) invented by Professor Nam P Suh:
Choose simpler solutions with simpler mechanisms. So for example the expansion ring design I though of..
..gets eliminated. It's too complex. This is the so-called axiom of minimum information. I know, very fancy.
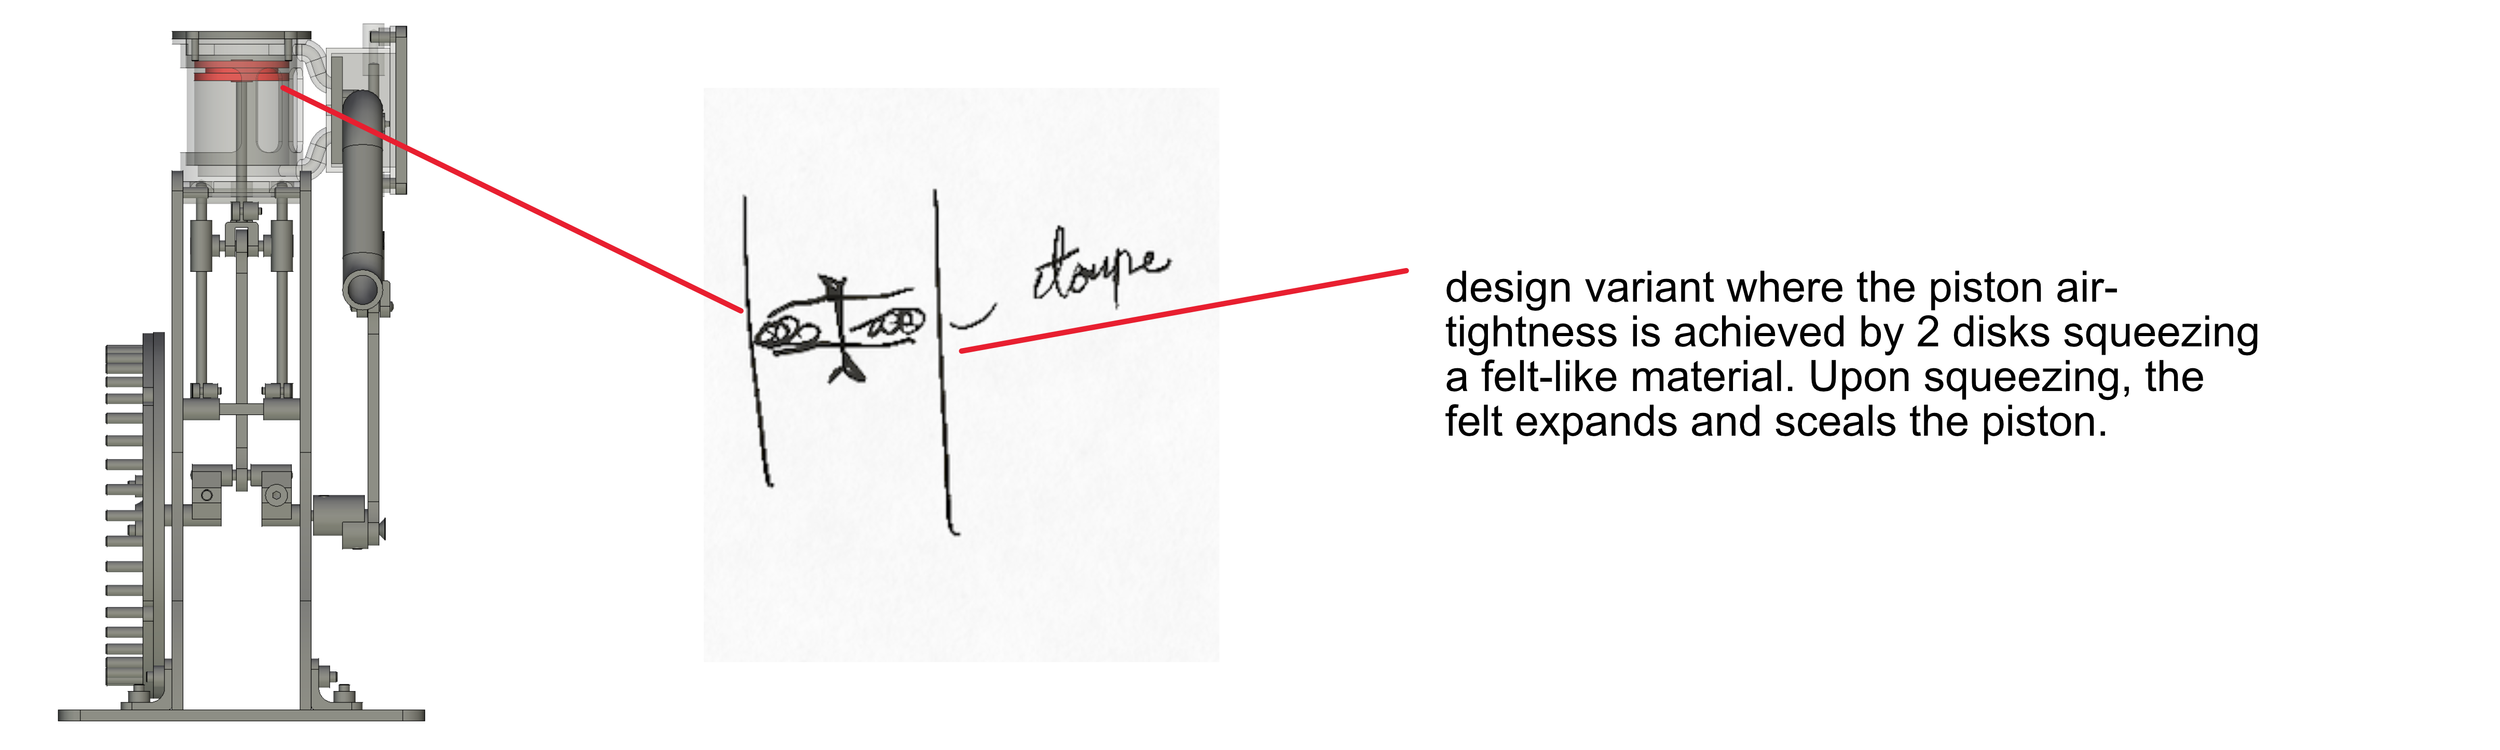
Then, I prioritize solutions which don't negatively impact too much the neighbouring mechanisms -if change is needed down the line. I know it's confusing. But let me exemplify: If you take that piston design variant,

..,whose air-tightness is principally guaranteed by the length of the piston. The longer the piston the more airtight it becomes. Great! But...if you afterwards discover that the piston needs to be made longer because it's still leaking too much you'll have to redesign you valve box there. And then you'd basically trigger a cascade of changes impacting your entire engine. Not good. What you want to settle with is a more independent solution. Indeed, the solution I settled myself with is this one:
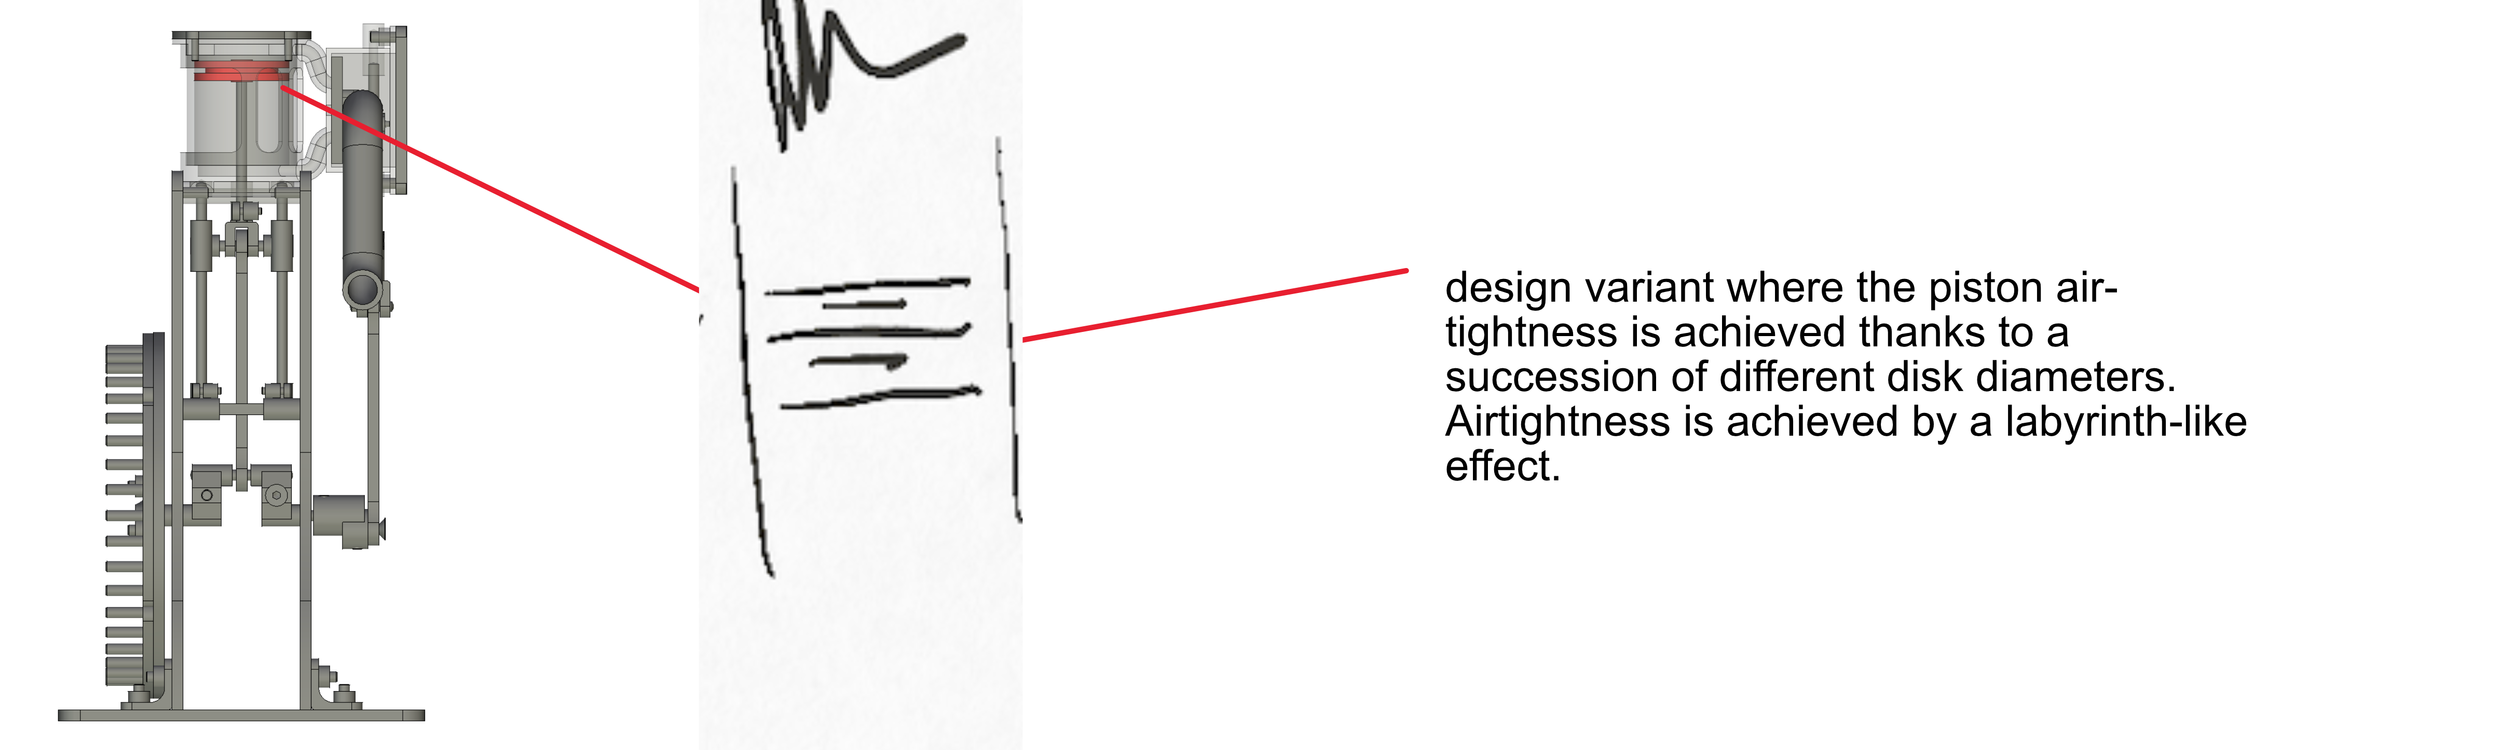
.Air-tightness is achieved by a combination of precisely cut wooden disks and a labyrinth effect by having 2 disks behind each other. If I discover that I'm not airtight enough: I can try making the disks more precise. I could experiment laser-cutting multiple disk diameter. I could try precisely tuning each disk diameter using sandpaper. Or I could add a third or forth disk if needed to reinforce the labyrinth effect. All in all, I have room for play with little to no impact on my design. And that's good. That's what we call the independence axiom.
What’s important?
To summarize, we have to:
start from most important and then successfully refine your design with increasingly less important details.
at the beginning of the design -we make make variants- because we don't want the important things to go sideways. And you've now just seen a few tools how to select each variant.
But let's then introduce the elephant in the room: what is important and what isn't?
Let's imagine you have 2 features which you'd like to rank according to importance. The feature of your design that is the most important is the feature that will risk bruising you the most downstream if you get it wrong. I know that’s all very abstract. So, let's take 2 features from our steam engine to exemplify this concept: the cylinder bore diameter versus the diameter of the flywheel:

If I get the cylinder bore diameter wrong, I risk not finding any transparent tubing. And, if I have to change that diameter, a whole slew things get impacted. On the other hand, if I discover I need a bigger flywheel, I simply need to stretch my base. It's easy.
Of course it all depends from the context. In the context of my engine, increasing height isn't a sweat, yet if that engine needs to be implemented within a boat or whatnot, then, it sure heck becomes the priority. So there: Features and aspects with, if changed down the line, may seriously put you into trouble. These features need to be prioritized and addressed first.
Conclusion
I like this method for its robustness. It works particularly well in projects which start from scratch and which most parts custom-made for your design. Naturally, this is just a bird's eye view. Starting from this theoretical base, I'll hopefully branch out in the future in different directions: How very complex designs involving hundreds of designers get approached. How I've trained to quickly come up with different design solutions. And much more.
If you have any questions, do not hesitate to contact me. I mean, I'd be absolutely thrilled if these tips boost your design skills. Happy thinking!